
Når det gjelder valg i Photoshop, er det virkelig to typer mennesker - de som vet hvordan de bruker pennverktøyet, og de som sliter. De fleste setter i gang med å lære seg å bruke pennverktøyet så lenge som mulig, mens andre aldri kommer seg rundt og lærer det, og tror det er for forvirrende, for komplisert og bare unaturlig.
Til syvende og sist lider arbeidet deres i Photoshop for det, siden de sitter fast og stoler på Lasso Tool for omtrent alt de ikke kan velge med Rectangular eller Elliptical Marquee Tools. I denne Adobe Photoshop-opplæringen skal vi få slutt på lidelsen. Vi skal lære hvor enkelt det egentlig er å gjøre valg med pennverktøyet.
Når jeg sier "enkelt", mener jeg ikke at du kommer til å lese denne opplæringen og umiddelbart bli forvandlet til en Pen Master. Å lære å bruke pennverktøyet er mye som å lære å sykle. Når du har lært det, vil det virke helt naturlig, og du vil lure på hvordan noen muligens ikke kunne vite hvordan du bruker noe så enkelt. Men å komme til det punktet krever litt trening og innsats, og mens du leser hver bok som er om hvordan du kan sykle, kan du lære deg det grunnleggende om hvordan pedalene, girene og bremsene fungerer, er det ikke før du sliter på sykkelen for å holde balansen at den virkelige læringen begynner.
Noe av det flotte med Pen Tool er at det ikke er noe som er eksklusivt for Photoshop. Langt ifra! Så godt som hvert populært program for redigering, grafikk og sideoppsett bruker Pen Tool i en eller annen form, så når du har lært hvordan du bruker det i Photoshop, vil du allerede ha en god forståelse av hvordan du bruker det i mange andre programmer også!
Hvor finner jeg pennverktøyet?
Før vi begynner å snakke om hva Pen Tool er eller hvordan vi bruker det, bør vi se på hvor vi finner det i Photoshop først. Du finner pennverktøyet i Verktøy-paletten, gruppert med Shape Tools, Type Tool og Stiutvalget (den hvite pilen) og Direkte valg (den svarte pilen) Verktøy (se bildet til venstre).
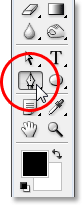
Photoshops pennverktøy
Selvfølgelig kan dette reise spørsmålet om hvorfor, hvis vi kan gjøre valg med pennverktøyet, ikke er det gruppert med de andre seleksjonsverktøyene (det rektangulære markeringsverktøyet, det Elliptiske markeringsverktøyet, Lasso-verktøyet, etc.) på toppen av verktøypaletten? Hvorfor er det der nede med de andre verktøyene som tydeligvis ikke er valgverktøy?
Det er et utmerket spørsmål, og det er tilfeldigvis et like utmerket svar å følge med det, som vi kommer til på et øyeblikk.
Hvorfor kalles det "penn" -verktøyet?
En av de første snublesteinene for å lære å bruke pennverktøyet, som med mange andre ting i Photoshop, er navnet, siden det tross alt er en ting som alle som noen gang har prøvd å bruke det, vet at dette ikke er noe penn. I hvert fall ikke den typen penn du vanligvis tenker på når du hører ordet "penn". Prøv å skrive navnet ditt med det på samme måte som du kan signere navnet ditt på et stykke papir med en penn, og du vil sannsynligvis ende opp med et snoet, sammenfiltret rot og ting som looper over hverandre (selvfølgelig, jeg antar at kan godt være hvordan du signerer navnet ditt).
 Pierre Bezier
Så hvis den ikke fungerer som en tradisjonell blekkpenn, hvorfor kalles den da pennverktøyet? Pennverktøyet har faktisk blitt kalt flere ting opp gjennom årene, og med det mener jeg ikke hva slags ting du kan ha kalt det i øyeblikk av frustrasjon. Du har kanskje hørt den referert til som Bezier-pennen eller Bezier-verktøyet, og det er fordi den ble opprettet av en mann ved navn Pierre Bezier (det er ham til venstre), en fransk ingeniør og en smart smart fyr som kom opp med fancy matematikk som driver verktøyet mens du jobber for Renault bilfirma (Pen Tool ble opprinnelig opprettet for å hjelpe med å designe biler).
Du har kanskje også hørt pennverktøyet referert til som stierverktøyet, og det er virkelig det mest passende navnet for det. Pennverktøyet handler om å tegne "stier". For å gjøre valg med pennverktøyet konverterer vi ganske enkelt stien eller stiene vi har tegnet til valg. Det begynner imidlertid alltid med en sti.
Kortkoder, handlinger og filtre-plugin: Feil i kortkode (ads-basics-middle-2)
Hva er en bane?
En "sti" er, helt ærlig, noe som kan virke litt malplassert i et program som Photoshop. Årsaken er fordi Photoshop først og fremst er et pikselbasert program. Det tar millioner av ørsmå små firkantede piksler som utgjør et typisk digitalt bilde og gjør ting med dem. Stier har derimot absolutt ingenting å gjøre med piksler, og det er grunnen til at jeg sa at de kan virke malplassert i et program som hovedsakelig brukes til redigering og tegning av piksler.
En bane er egentlig ikke annet enn en linje som går fra et punkt til et annet, en linje som er helt uavhengig av og ikke bryr seg noe om pikslene under den. Linjen kan være rett eller den kan være krum, men den går alltid fra et punkt til et annet punkt, og som jeg nevnte har det ikke noe å gjøre med pikslene i bildet. En bane er helt adskilt fra selve bildet. En bane er faktisk så atskilt at hvis du prøvde å skrive ut bildet ditt med en bane synlig på skjermen, ville ikke banen vises på papiret. Hvis du lagret bildet ditt som en JPEG.webp-fil og lastet det opp til et nettsted, selv om du lagret bildet med banen som er synlig på skjermen din i Photoshop, vil du ikke se det på bildet på nettstedet. Stier er bare for øynene dine og bare for Photoshop. Ingen andre vil noensinne se dem, med mindre de tilfeldigvis går forbi datamaskinen mens du jobber.
Vi trenger alltid minimum to punkter for å lage en bane, siden vi trenger å vite hvor banen starter og hvor den ender. Hvis vi bruker nok punkter til at vi kan bringe banen vår tilbake til det samme punktet den startet fra, kan vi lage forskjellige former ut av stier, som er nøyaktig hvordan Photoshop sine forskjellige Shape Tools fungerer. Rektangelverktøyet bruker stier, forbundet med punkter, for å tegne en rektangulær form. Ellipse-verktøyet bruker stier, forbundet med punkter, for å tegne en elliptisk form, og så videre. Det er også hvordan Photoshop Type Tool fungerer, selv om Photoshop-håndtak skriver litt annerledes enn det håndterer vanlige former, men all type i Photoshop er egentlig laget av stier. Faktisk kan du konvertere type til figurer, som deretter gir deg alle de samme sti-redigeringsalternativene med typen som du får når du jobber med figurer.
Du har kanskje også hørt stier referert til som konturer, og det er en ganske god beskrivelse av hva en sti er, eller i det minste, hva en sti kan være. Vi kan tegne en firkantet sti, og hvis vi ikke gjør noe annet med det, som i at vi ikke fyller det med en farge eller bruker et slag på det, så alt vi har er en grunnleggende kontur av et kvadrat. Samme med en sirkel eller annen form vi tegner. Selve banen er bare omrisset av formen. Det er ikke før vi gjør noe med banen, som å fylle den, bruke et slag eller konvertere den til et utvalg, at banen faktisk blir noe mer enn en grunnleggende disposisjon.
Du kan velge en hel bane ved hjelp av banen til valg av verktøy (også kjent som "svart pil" -verktøyet), eller du kan velge individuelle punkter eller banesegmenter ved å bruke Direct Selection Tool (verktøyet "hvit pil"). En sti "segment", eller "linjesegment" som det noen ganger kalles, er en hvilken som helst bane mellom to punkter. En rektangulær bane, for eksempel, vil bestå av fire punkter (ett i hvert hjørne), og de individuelle banene som forbinder punktene sammen langs toppen, bunnen, til venstre og høyre for å skape formen til rektangelet er stien segmenter . Selve banen selv er kombinasjonen av alle de individuelle banesegmentene som utgjør formen.
Det kan være litt forvirrende, så la oss se hva jeg mener. Åpne et nytt dokument inne i Photoshop. Det spiller ingen rolle hvilken størrelse det er. Jeg velger 640x480-størrelsen fra listen over forhåndsinnstillinger, men som sagt, det spiller ingen rolle hvilken størrelse du velger. Velg pennverktøyet fra verktøypaletten. Du kan også velge pennverktøyet ganske enkelt ved å trykke på bokstaven P på tastaturet.
De to pennverktøymodus
Før vi fortsetter, må vi først sørge for at vi jobber med stier, og det er fordi pennverktøyet faktisk har to forskjellige moduser det kan fungere i, og som standard bruker det det andre. Med pennverktøyet valgt, vil vi se en gruppe på tre ikoner hvis vi ser opp i Alternativer-linjen øverst på skjermen:

Alternativlinjen i Photoshop som viser gruppen med tre ikoner som representerer hver av de tre pennverktøy-modusene.
Jeg vet at jeg sa at det er to moduser Pen Tool kan fungere i, og ennå, som for å gjøre ting mer forvirrende, er det tre ikoner, men ikonet til høyre, som er Fyll piksler-ikonet, er nedtonet og ikke tilgjengelig når du jobber med pennverktøyet. Det er bare tilgjengelig når du jobber med de forskjellige Shape Tools, så det er egentlig bare to ikoner vi trenger å se på.
Ikonet til venstre er Shape-lags-ikonet, også kjent som "ikke det vi vil ha", og det er det som er valgt som standard. Hvis vi skulle jobbe med pennverktøyet med det ikonet valgt, ville vi tegnet former, akkurat som om vi brukte noen av de forskjellige formverktøyene, bortsett fra at i stedet for å tegne en forhåndsdefinert form som et rektangel eller en ellipse, kunne tegne hvilken som helst form vi ønsket. Som jeg sa, det er ikke det vi ønsker. Vi vil at ikonet ved siden av, Paths-ikonet, så gå videre og klikk på det for å velge det:

Photoshop-veiledninger: Klikk på "Stier" -ikonet i alternativlinjen for å arbeide med stier med pennverktøyet.
Når pennverktøyet er valgt og stierikonet valgt i alternativlinjen, klikker du en gang hvor som helst i dokumentet. Ikke klikk og dra, bare klikk. Når du gjør det, legger du til et lite firkantet punkt. Jeg har forstørret det her:

Klikk en gang i dokumentet med pennverktøyet for å legge til et poeng.
Dette første punktet vi nettopp har lagt til, er utgangspunktet for vår vei. Nå for øyeblikket har vi ikke en vei. Alt vi har er et utgangspunkt. "Punktet" kalles teknisk sett et anker- eller ankerpunkt, og det heter det fordi det forankrer banen på plass. Dette første punktet vil forankre begynnelsen av banen til dette stedet inne i dokumentet. Når vi legger til flere punkter, vil hver av dem forankre banen på plass på det stedet.
La oss legge til et annet poeng. Klikk et annet sted i dokumentet. Hvor som helst vil gjøre. Jeg kommer til å klikke et sted til høyre for mitt første punkt:

Photoshop Tutorials: Legg til et annet ankerpunkt ved å klikke et annet sted inne i dokumentet.
Jeg har nå lagt til et annet ankerpunkt, og se hva som har skjedd. Jeg har nå en rett linje som sammenføyer de to punktene! Den rette linjen er min vei. Som jeg nevnte tidligere, trenger vi minimum to punkter for å lage en bane, siden vi trenger å vite hvor banen starter og hvor den ender, og nå som vi har både et start- og sluttpunkt, klarte Photoshop å koble til to punkter sammen, og skaper vår vei.
La oss legge til noen flere poeng bare for moro skyld. Klikk noen ganger til på forskjellige steder i dokumentet. Igjen, ikke klikk og dra, bare klikk:
Legg til flere punkter ved å klikke på forskjellige steder i dokumentet.
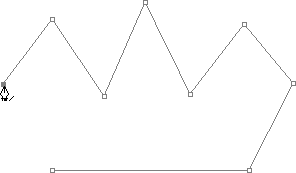
På bildet over har jeg lagt til syv flere ankerpunkter ved å klikke på forskjellige steder med pennverktøyet, og hver gang jeg la til et, økte lengden på banen min fordi en ny bane "segment" ble lagt til mellom forrige punkt og det nye poenget. Stien min består nå av ni ankerpunkter og åtte stisegmenter. Jeg kunne fortsette å klikke rundt i dokumentet for å legge til flere ankerpunkter og banesegmenter, men det jeg virkelig vil gjøre nå er å stenge banen min slik at den danner en fullstendig form.
Lukke en bane
For å lukke en bane, er alt vi trenger å gjøre å klikke igjen på vårt første utgangspunkt. Når du holder musepekeren over startpunktet, vil du se en liten sirkel vises i nedre høyre hjørne av pennikonet:

En liten sirkel vises i nedre høyre hjørne av pennikonet når du holder musepekeren over banens første startpunkt.
Den sirkelen forteller oss at vi er i ferd med å komme "full sirkel" med banen vår, og avslutte den der den begynte. For å lukke det, klikker du direkte på startpunktet.
Vi kan se nedenfor at banen min har blitt en lukket bane og nå er en grunnleggende omriss av en form:
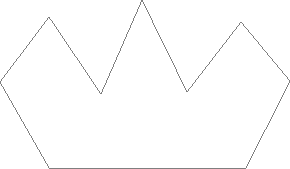
Stien er nå stengt, avslutter ved startpunktet, og skaper en lukket sti.
Selv om denne stien ble tegnet bare for moro skyld som et eksempel på hvordan du tegner en grunnleggende sti med Pen Tool, kan jeg enkelt gjøre denne stien til et utvalg. For det trenger vi Photoshop's Paths-palett, og vi ser på den neste.
Å snu en bane til et utvalg
Så langt har vi sett på hva en sti er og hvordan du tegner en grunnleggende bane med Photoshop's Pen Tool. Men hvordan kan du gjøre et valg fra banen?
Lett! Det er et par måter å gjøre en bane til et utvalg, inkludert en hendig hurtigtast, men før vi ser på den raske måten, la oss se på den offisielle måten. Den "offisielle måten" innebærer å bruke Photoshop's Paths-palett, som du finner gruppert med lag-paletten og Channels-paletten:
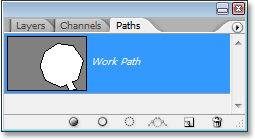
Photoshop's Paths Palette.
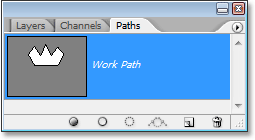
Ved første øyekast ser Paths-paletten veldig lik Photoshops Layer-palett, og Adobe gjorde den med vilje slik, slik at du vil føle deg mer komfortabel med å bruke den. Vi kan se en forhåndsvisning av miniatyrbilder av formen til banen vi nettopp opprettet, og som standard navngir Photoshop banen "Work Path", som i utgangspunktet er en fancy måte å si "midlertidig" på, som om du skulle lage en annen banen nå uten å døpe denne banen til noe annet først, ville denne bli erstattet av den nye banen. Du kan bare ha en "Work Path", så hvis du vil beholde den, må du dobbeltklikke på navnet i Paths-paletten og gi den noe annet navn før du oppretter en ny bane.
Siden banen min ser litt ut som en krone, skal jeg dobbeltklikke på navnet "Work Path", som med dialogboksen Save Path kommer frem til Photoshop, og jeg vil gi nytt navn til banen "Crown":

Du kan lagre en midlertidig "Work Path" bare ved å gi den nytt navn.
Jeg skal klikke OK når jeg er ferdig, og nå, hvis jeg ser på banen til paletten min igjen, kan jeg se at det er sikkert at "Arbeidsstien" har fått nytt navn til "Crown":
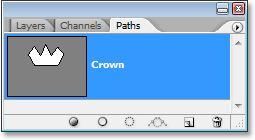
Paths-paletten som viser at banen har fått nytt navn til "Crown".
Ved å gi den nytt navn, er banen nå lagret og forsvinner ikke på meg hvis jeg går til å opprette en ny bane. Eventuelle lagrede baner blir også lagret med Photoshop-dokumentet, så nå, hvis jeg lagrer dokumentet mitt, vil banen bli lagret med det, og neste gang jeg åpner dokumentet, vil banen fremdeles være der i banen til paletten.
Å lagre en bane er ikke noe du trenger å gjøre for å gjøre den til et utvalg. I de fleste tilfeller når du bruker pennverktøyet til å foreta valg, vil du ikke ha noe behov for banen når du har valgt et valg fra den, så det vil ikke være behov for å lagre den. Hvis du ikke vil lagre det, bare gi det nytt navn til noe annet enn "Work Path", og det er lagret.
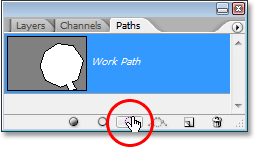
For å gjøre banen til et utvalg, hvis vi ser på bunnen av banen til paletten, kan vi se flere ikoner. Disse ikonene lar oss gjøre forskjellige ting på veien. Det første ikonet til venstre er Fyll banen med forgrunnsfargeikonet, og som navnet tilsier, å klikke på det vil fylle banen vår med vår nåværende forgrunnsfarge. Interessant, men det er ikke det vi ønsker. Det andre ikonet fra venstre er Stroke banen med børsteikonet, som vil bruke et slag på banen vår ved å bruke den penselen vi for øyeblikket har valgt.
Dette er en flott måte å skape interessante effekter i Photoshop, men for det vi gjør her, ved å gjøre en sti til et utvalg, er det heller ikke det vi ønsker. Det vi ønsker er det tredje ikonet fra venstre, Last banen som et valgikon:
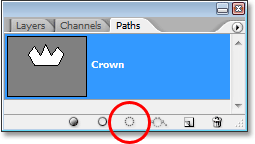
Ikonet "Last bane som et utvalg" nederst på paletten.
Så snart jeg klikker på dette ikonet, blir banen i dokumentet mitt et utvalg, som om jeg hadde opprettet det ved å bruke et av de mest vanlige Photoshop-verktøyene:
Stien er nå konvertert til et utvalg.
Det er så enkelt! Det er faktisk enda enklere enn det fordi det er en snarvei for å gjøre en bane om til et valg uten å måtte bytte til Paths-paletten i det hele tatt. Når du har tegnet banen din og er klar til å gjøre den om til et utvalg, trykker du bare på Ctrl + Enter (Win) / Command + Return (Mac) for å la Photoshop konvertere banen til et valg.
Nå kan det være litt mer opplagt for deg, selv om Pen Tool er veldig mye et utvalg, er det ikke gruppert med de andre markeringsverktøyene øverst på Tools-paletten. Årsaken er fordi pennverktøyet først og fremst er et stiverktøy. Det oppretter valg ved først å opprette stier, og av den grunn har det mer til felles med de forskjellige Shape Tools og Type Tool, som alle bruker stier, enn det har med de grunnleggende valgverktøyene som Rectangular Marquee Tool eller Lasso Verktøy, som gjør valg bare basert på piksler.
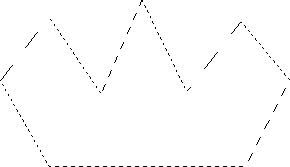
La oss se på et praktisk eksempel på det vi har lært så langt. Her har vi et bilde av et stoppskilt foran noen svaberg:

Et bilde av et stoppskilt.
La oss si at jeg ønsket å velge det stoppskiltet, så jeg kan kopiere det til sitt eget lag. Stoppskiltet består av noe mer enn en serie rette linjer, noe som skal gjøre dette ekstremt enkelt. Først trenger jeg et utgangspunkt for banen min, så jeg starter i øverste venstre hjørne av skiltet ved å klikke en gang for å plassere et innledende ankerpunkt. I dette tilfellet spiller det ingen rolle hvor jeg starter banen, men jeg starter i øvre venstre hjørne:
Klikk en gang i øverste venstre hjørne av stoppskiltet for å begynne banen med et første ankerpunkt.
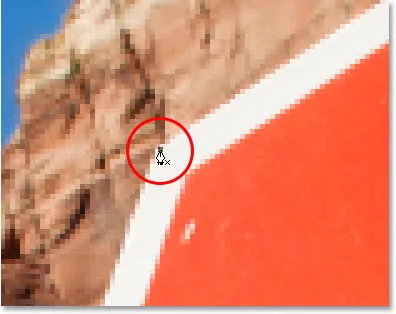
Legg merke til hvordan jeg har zoomet inn her når jeg klikker. Du vil finne det lettere når du velger valg med pennverktøyet for å zoome litt inn på bildet. På den måten kan du være sikker på at du holder veien rett innenfor området du vil velge.
Akkurat nå har jeg ikke en bane, jeg har bare et utgangspunkt for min vei. For å lage banen, er alt jeg trenger å gjøre å gå rundt skiltet og legge til et ankerpunkt i hvert hjørne der banen må endre retning. Når jeg legger til hvert ankerpunkt, vil det vises et nytt banesegment som kobler til det forrige ankerpunktet med det nye, til jeg har gått helt rundt skiltet. For å lukke banen, klikker jeg ganske enkelt tilbake på det første utgangspunktet. Det er litt vanskelig å se på skjermdumpen nedenfor, men jeg har nå en sti rundt hele stoppskiltet, inkludert innlegget det er festet til, ganske enkelt ved å gå rundt å klikke i hjørnene der banen må endre retning:

En sti vises nå rundt stoppskiltet i bildet.
Hvis jeg ser i Paths-paletten min nå, kan jeg se veldig tydelig at jeg har en sti i form av stoppskiltet:
Photoshops Paths-palett som viser banen tegnet rundt stoppskiltet.
Legg merke til hvordan Photoshop har navngitt banen "Work Path", noe som betyr at denne banen er midlertidig, og jeg vil miste den hvis jeg oppretter en annen bane uten å lagre denne først ved å gi den nytt navn. Selv om jeg ikke oppretter en ny bane, vil jeg fortsatt miste den når jeg lukker ut dokumentet med mindre jeg lagrer det først. Jeg har imidlertid ikke behov for å redde denne veien, så jeg vil ikke bekymre meg for den. I de fleste tilfeller trenger du ikke å bekymre deg for det heller.
For å konvertere banen min til et valg, klikker jeg på Last banen som et markeringsikon nederst på lagpaletten, eller så kunne jeg like enkelt trykke på Ctrl + Enter (Win) / Command + Return (Mac):
Klikk på "Last inn bane som et utvalg" -ikonet i banen til paletten, eller trykk "Ctrl + Enter" (Win) / "Command + Delete" (Mac) for å konvertere banen til et valg.
Så snart jeg gjør det, blir banen min omgjort til et utvalg, og stoppskiltet er nå valgt:

Stoppskiltet er nå valgt etter å ha konvertert banen til et valg.
Jeg vil bytte tilbake til lagpaletten min, og for å kopiere stoppskiltet til sitt eget lag, bruker jeg tastatursnarveien Ctrl + J (Win) / Command + J (Mac), som plasserer skiltet på egen hånd lag over bakgrunnslaget:
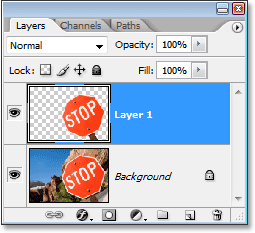
Stoppskiltet er nå kopiert til sitt eget separate lag.
Med skiltet nå på sitt eget lag, kan jeg gjøre hva jeg vil med det, bytte bakgrunnen med et annet bilde, eller gjøre bakgrunnen svart / hvitt mens jeg forlater skiltet i farger, hva jeg kan tenke på. Poenget er at jeg enkelt kunne velge skiltet ved å klikke i hjørnene med Pen Tool, som skapte en bane rundt skiltet, og så konverterte jeg ganske enkelt banen til et utvalg.
Så langt i vårt blikk på valg av pennverktøy i Photoshop, har vi lært at pennen er et utvalg av verktøy som Photoshops vanligste valgverktøy som Rectangular Marquee og Lasso Tools, men at i stedet for å gjøre valg basert på piksler som de andre verktøyene gjør, tegner pennverktøyet stier som deretter enkelt kan konverteres til valg, enten fra Paths-paletten eller ved å bruke hurtigtasten.
Det er grunnen til at pennen ikke finnes øverst på Verktøy-paletten med de andre pikselbaserte markeringsverktøyene, men i stedet er gruppert i med baneverktøyene, som de forskjellige formverktøyene, Typeverktøyet, og Verktøyet for valg av veier og direkte valg . Pennverktøyet handler om stier, ikke piksler.
Vi har lært at vi kan legge til ankerpunkter i dokumentet vårt, som forankrer banen på plass, ved å bare klikke på forskjellige steder med pennverktøyet, og når vi legger til flere og flere ankerpunkter, lager vi en bane som hvert nytt punkt er koblet til det forrige punktet av et nytt banesegment. Vi har også lært at en bane er det som vanligvis kalles et "ikke-utskriftselement", noe som betyr at uansett hvor mange stier vi legger til, vil ingen av dem være synlige på papiret når vi skal skrive ut bildet . De vil heller ikke være synlige hvis vi viser bildet på et nettsted. Stier er bare synlige for oss når du jobber i Photoshop (selv om andre programmer som Adobe Illustrator også støtter stier). Det er ikke før vi gjør noe med banen, som å fylle den med en farge, bruke et strøk på den eller konvertere den til et utvalg, at banen blir noe mer enn bare en grunnleggende, uten utskrift av en form.
Vi så hvor enkelt det ville være å bruke pennverktøyet til å velge noe som et stoppskilt ved å skissere det med en sti som er sammensatt av en serie rette strektsegmenter og deretter gjøre stien om til et utvalg. Det er flott, men egentlig har vi ikke gjort noe ennå som vi ikke kunne ha gjort lettere med noe som Lasso Tool, eller enda bedre, Polygonal Lasso Tool som ble bygget spesielt for å velge flat-sidige former som stoppet vårt skilt. Sjansen er stor, med mindre du har noen merkelig fascinasjon for veiskilt, før eller siden vil du velge noe litt mer interessant, og med "interessant" mener jeg mer utfordrende. Og med å "utfordre", mener jeg noe som inneholder kurver. Velge et buet objekt i Photoshop er vanligvis når du opplever å miste all respekt for de grunnleggende valgverktøyene. Heldigvis hender det også at det er tiden da Pen Tool virkelig skinner!
Før vi fortsetter, skal jeg påpeke at alt vi har gjort opp til dette punktet har vært ganske enkelt. Klikk her, klikk der, konverter banen til et utvalg, ferdig. Denne neste delen der vi kommer til å tegne kurver er ikke så enkel, selv om det absolutt ikke er vanskelig, men hvis dette er første gang du bruker Pen Tool eller du ikke har mye erfaring med det, kan det virke som om du arbeider med kurver litt unaturlig og til og med litt overveldende. Det er definitivt her "sykle" -analogien kommer inn. Det kan hende du faller av et par ganger med det første og lurer på hvordan noen klarer å gjøre det, men jo mer du trener og jo mer du holder deg med det, desto mer fornuftig er alt begynner å lage. På kort tid vil det virke som en annen natur for deg, og du vil plutselig forstå hvorfor så mange mennesker sverger at Pen Tool er det største utvalgte verktøyet i hele Photoshop! Seriøst er det virkelig.
Få et håndtak på retningshåndtak
La oss begynne på nytt med pennverktøyet. Åpne et nytt tomt Photoshop-dokument, eller slett bare det du har gjort så langt i det eksisterende dokumentet, så vi begynner på nytt. Når pennverktøyet er valgt og Paths-alternativet er valgt i alternativlinjen (husk at det er standard for alternativet Formlag, så du må sørge for at alternativet Paths er valgt), klikk en gang hvor som helst i dokumentet, akkurat som det gjorde vi før. Denne gangen, i stedet for bare å klikke for å legge til et ankerpunkt, klikker du og drar musen et lite stykke unna ankerpunktet før du slipper museknappen:
Klikk hvor som helst i dokumentet med pennverktøyet, og dra deretter et lite stykke unna ankerpunktet.
Når du er ferdig, vil du se et ankerpunkt med to linjer som strekker seg ut fra det. Ved første øyekast tror du kanskje at vi på en eller annen måte har klart å dra ut en sti med pennverktøyet. Det ser jo ut som om vi har tre ankerpunkter, ett i hver ende og ett i midten, med to stisegmenter som forbinder dem. Hvis vi imidlertid ser litt nærmere, kan vi se at punktene i begge ender er litt mindre enn det i midten, og at de faktisk har en annen form. Den i midten er firkantet, og som vi har sett er et ankerpunkt firkantet, men de i begge ender ser ut til å være diamantformet. Er noen ankerpunkter firkantede og noen diamantformede?
Nei. Alle ankerpunktene er firkantede, og de er alle i samme størrelse, noe som betyr at de mindre, diamantformede punktene på endene ikke er ankerpunkter. Og hvis de ikke er ankerpunkter, betyr det at linjene ikke er banesegmenter, siden vi trenger minst to ankerpunkter for å lage en bane, og akkurat nå er det eneste ankerpunktet vi har det i midten. Så hva er egentlig linjene som strekker seg fra ankerpunktet? Det er retningshåndtak!
"Ah, retning håndterer!" du sier. "Nå forstår jeg!"
… … …………….
"Vent, nei, det gjør jeg ikke. Hva pokker er retningshåndtak?"
Retningshåndtak er vel, håndtak, og de brukes bare når du oppretter buede banesegmenter. Det er ikke behov for retningshåndtak når du oppretter rette strekningssegmenter. Det er vanligvis to av dem, selv om det noen ganger bare er én, og som vi allerede har sett, strekker de seg ut fra ankerpunkter. De kalles "håndtak" fordi du, som vi ser på et øyeblikk, faktisk kan ta tak i dem og flytte dem rundt.
Retningshåndtak kontrollerer to ting. De kontrollerer vinkelen på kurven, og de kontrollerer lengden på kurven, og de gjør det på en veldig fin måte. Årsaken til at det vanligvis er to av dem er fordi den ene av dem styrer vinkelen og lengden på kurven som kommer inn i ankerpunktet, og den andre styrer vinkelen og lengden på kurven som strømmer ut fra ankerpunktet.
Før vi ser på hvordan vi tegner kurver med retningshåndtakene, la oss først se hvordan du kontrollerer håndtakene selv, siden vår suksess med tegningskurver vil avhenge mye av vår evne til å kontrollere håndtakene. Ikke bekymre deg, det er ikke, som de sier, rakettvitenskap. Det er bare noen få enkle ting du trenger å lære. Vi har allerede sett hvordan du lager retningshåndtak, ved å klikke med pennverktøyet og deretter dra bort fra ankerpunktet. Jo lenger vekk fra forankringspunktet vi drar, jo lengre blir retningshåndtakene. Jo lengre håndtak, jo lengre kurve. Kort håndtak, kort kurve. Langt håndtak, lang kurve.
Noe av det fine du vil lære ganske raskt om pennverktøyet, er at det er ekstremt tilgivende. Det er ingen grunn til å bekymre deg for å få ting til rette første gang når vi tegner baner med det, fordi vi kan gå tilbake og ordne opp i ting når vi er ferdige! Plasserte du et ankerpunkt på feil sted? Ikke noe problem! Bare flytt den dit du trenger den! Vi får se hvordan vi gjør det om et øyeblikk. Har du dratt ut et retningshåndtak i feil retning? Ikke et problem. Ta tak i håndtaket og vri det i den retningen du trenger. Igjen, vi får se hvordan vi gjør det. Er en av retningene dine håndtakene for lange eller for korte? Ikke noe problem i det hele tatt. Bare klikk på den og dra den lenger eller kortere etter behov (jep, vi skal se hvordan du gjør det også). Stier er fullt redigerbare til enhver tid, så det er absolutt ingen grunn til å bekymre deg for å gjøre en feil eller få den riktig første gang. Gjør det ikke at du føler deg litt bedre allerede?
Rotere og endre størrelse på retningene
Som jeg nevnte, kalles de retning "håndtak" fordi du kan ta tak i dem som håndtak og flytte dem rundt. La oss se hvordan vi gjør det. Først skal vi se på hvordan du roterer begge håndtakene samtidig. Ved å bruke forankringspunktet og de to retningshåndtakene vi allerede har opprettet, holder du Ctrl (Win) / Command (Mac) -tasten nede. Du vil se Pen Tool-ikonet midlertidig bli til Direct Selection Tool (den hvite pilen) -ikonet, og det er fordi når Pen Tool er valgt, blir "Ctrl / Command" en rask snarvei for midlertidig tilgang til Direct Selection Tool som er valgt hva vi bruker for å velge forskjellige deler av banen vår. Klikk deretter bare direkte på den lille diamantformen på slutten av et av retningshåndtakene (å klikke på selve "linjen" fungerer ikke, så du trenger alltid å klikke på diamantformen på slutten av et håndtak for å gjøre noe og dra det rundt ankerpunktet for å rotere det. Når du roterer ett av håndtakene, roterer det andre håndtaket sammen med det i motsatt retning, liksom en sag. Du vil kanskje også legge merke til at så snart du begynner å dra i håndtaket, vil musepekersymbolet endres igjen, denne gangen til Flytt verktøyikonet, siden vi flytter noe fra et sted til et annet:
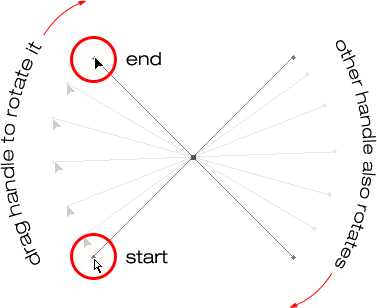
Hold "Ctrl" (Win) / "Command" (Mac) og klikk på enden av et av retningshåndtakene, og dra deretter håndtaket for å rotere det rundt ankerpunktet. Når du drar det ene håndtaket, roterer det andre i motsatt retning.
Du kan slippe "Ctrl / Command" -tasten når du har begynt å dra i håndtaket. Ingen grunn til å holde den nede hele tiden.
For å endre størrelse på et retningshåndtak når du roterer det, drar du bare enden av håndtaket inn mot ankerpunktet for å gjøre det kortere eller dra det vekk fra ankerpunktet for å gjøre det lengre. Som jeg nevnte over, vil et kortere håndtak gjøre kurven kortere, og et lengre håndtak vil gjøre kurven lengre. Du kan ikke endre størrelsen på begge håndtakene samtidig, så hvis du trenger å endre størrelsen på begge, må du dra hver eller en lenger eller kortere hver for seg. Det eneste du kan gjøre mot dem begge samtidig er å rotere dem. Hvis du allerede har sluppet museknappen etter å ha rotert håndtakene, og markøren har endret seg tilbake til Pen Tool-ikonet, og du må endre størrelsen på et av håndtakene, må du holde nede "Ctrl / Command" igjen for å midlertidig bytt tilbake til Direct Selection Tool og klikk og dra på slutten av håndtaket for å endre størrelsen på det:
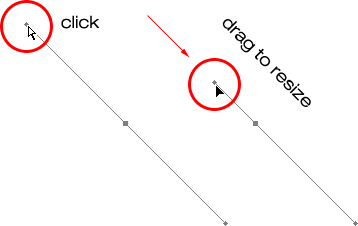
Dra endene på håndtakene inn mot ankerpunktet for å forkorte dem, eller dra dem bort fra ankerpunktet for å gjøre dem lengre.
La oss se på hvordan du roterer håndtakene uavhengig av hverandre. To rotate one handle without affecting the other one, first release your mouse button if you've been rotating or resizing the handles so your cursor changes back into the Pen Tool icon. Then, instead of holding down "Ctrl/Command", which moves both handles at once, hold down your Alt (Win) / Option (Mac) key and click on the end of either of the direction handles. You'll see your cursor change into the Convert Point Tool icon, which looks like a simplified arrow made of only two lines, almost like an upside down letter "v" (except that it's not quite upside down). Then, simply drag the handle around the anchor point to rotate it, just as you did before, and this time, the handle will rotate independently of the other one, breaking the connection between them:
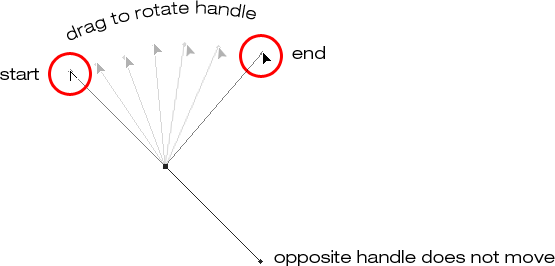
Hold down "Alt" (Win) / "Option" (Mac) and click on the end of either of the direction handles, then drag the handle to rotate it around the anchor point independently of the other handle.
Again, you can release your "Alt/Option" key after you've started dragging. You don't have to hold it down the whole time.
You can also resize direction handles using the "Alt/Option" key in exactly the same way as you can with the "Ctrl/Command" key. If you're in the process of rotating a handle, simply drag it in towards the anchor point to make it shorter or away from the anchor point to make it longer. If you've already released your mouse button and your cursor is showing the Pen Tool icon again, you'll need to hold down "Alt/Option" once again, then click on the end of the handle and drag it to resize it.
Is there a difference between resizing the handles using "Ctrl/Command" and using "Alt/Option" to do it? Yes there is. If you haven't yet "broken the connection" between the handles by dragging one independently of the other, resizing a handle using "Ctrl/Command" will keep the handles connected together. It won't resize both handles at once, but it won't break the connection between them either so you'll still be able to rotate them together if you need to. If you resize a handle using "Alt/Option", you'll break the connection between the handles. Even if you don't rotate the handle as you're resizing it, the connection will still be broken.
What if you've broken the connection between the handles by rotating them using "Alt/Option" and then want to rotate them together again? Can you "rebuild the connection", so-to-speak, by selecting one of them while holding down "Ctrl/Command" as before? Good question, and the answer is no. Once you've broken the connection between the handles, the "Ctrl/Command" key on its own won't bring it back. You'll need to select one of the handles while holding Ctrl+Alt (Win) / Command+Option (Mac) at that point in order to move the handles together again.
Quick Summary So Far …
We've covered a lot of information here about working with direction handles, so before we move on and start drawing some actual curves, let's do a quick recap:
- To add an anchor point, simply click with the Pen Tool.
- To add an anchor point with direction handles extending out from it, click with the Pen Tool, then drag away from the anchor point before releasing your mouse button. The further you drag, the longer the direction handles will be.
- To rotate the direction handles together, hold down Ctrl (Win) / Command (Mac), which will temporarily switch you to the Direct Selection Tool, then click on the end of either handle and drag it around the anchor point. The other handle will rotate in the opposite direction.
- To rotate the direction handles independently, hold down Alt (Win) / Option (Mac), which will temporarily switch you to the Convert Point Tool, then click on the end of either handle and drag it around the anchor point. The other handle will not rotate.
- To resize handles without breaking the connection between them, hold down Ctrl (Win) / Command (Mac) to switch to the Direct Selection Tool, then click on the end of either handle. Drag it towards the anchor point to make it shorter, or drag it away from the anchor point to make it longer.
- To resize handles and break the connection between them, hold down Alt (Win) / Option (Mac) to switch to the Convert Point Tool, then click on the end of either handle. Drag it towards the anchor point to make it shorter, or drag it away from the anchor point to make it longer.
- To rotate the direction handles together after breaking the connection, hold down Ctrl+Alt (Win) / Command+Option (Mac), then click on the end of either handle and drag it around the anchor point. The other handle will once again rotate with it.
Okay, that pretty much covers the basics of how to control the direction handles. Let's see how we can use them to draw some curves!
We've covered a lot of ground so far. We know about anchor points and direction handles. We know that in order to draw straight path segments, all we need to do is lay down a series of anchor points wherever we need them simply by clicking with the Pen Tool, and as we add more and more anchor points, we add more straight sections to our path. We know how to create direction handles and how to rotate them, either together or separately, and how to resize them.
We know how to turn a path into a selection by clicking on the "Load path as selection" icon at the bottom of the Paths palette or by simply pressing "Ctrl+Enter" (Win) / "Command+Return" (Mac) on the keyboard. One thing I didn't mention yet is that regardless of whether our path consists of straight lines,
curves, or a combination of straight lines and curves, converting it into a selection is done exactly the same way, and we've already learned how to do it, which means we're well on our way to mastering making selections with the pen! All we need to do is get a bit of practice drawing curves, which is exactly what we're about to do!
Fremdeles bla? Last ned denne opplæringen som en PDF!
Drawing A Curve
Let's once again start fresh, either by opening up a new blank document in Photoshop or by deleting what you've already done. We're going to draw our first curve so we can put all of our newly-aquired direction handle knowledge to use. First, with the Pen Tool selected and the Paths option selected in the Options Bar, click once somewhere in your document to add an anchor point. Just click, don't click and drag. You should have one single anchor point on the screen when you're done.
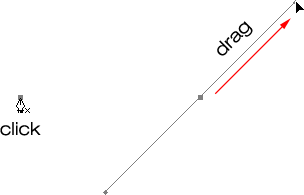
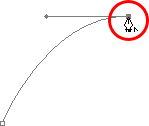
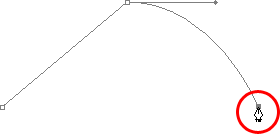
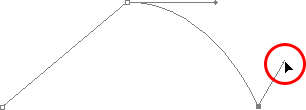
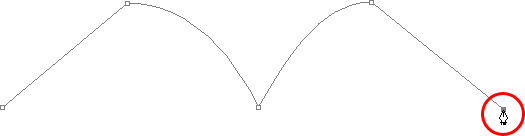
Then, move your mouse cursor up and to the right of your initial anchor point. Click again to add a second anchor point, but this time, drag your mouse a little to the right of the anchor point to drag out direction handles. Hold down Shift as you drag to constrain your movement to a horizontal direction. As you drag out the direction handles, you'll see your path appearing as a curve between the two anchor points! The further you drag your mouse, the longer you make the direction handles, and the more of a curve you create:
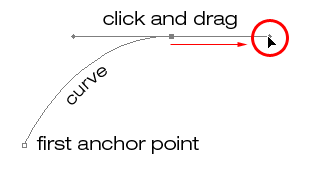
Click once to add an anchor point, then click and drag out a second anchor point with direction handles, creating a curved path segment between the two points.
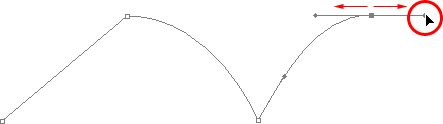
Click down and to the right of the second anchor point to add a third anchor point. This time, don't click and drag, just click:
Add a third anchor point down and to the right of the second one by clicking with the Pen Tool.
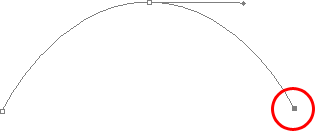
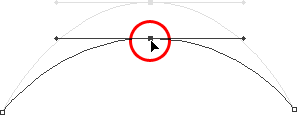
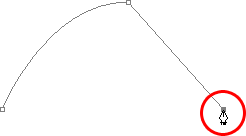
As soon as you add the third anchor point, a second path segment will appear, joining the second anchor point with the third one. And because our second anchor point has direction handles extending from it, this new path segment is also curved! We now have a nice, smooth arc starting from the first point on the left, then passing through the anchor point with the direction handles up top, and coming to an end at the third point.
One thing you may have noticed, and you can see it in the screenshot above, is that when you added the third anchor point, the direction handle extending out the left side of the second anchor point disappeared. It's still there, Photoshop simply hid it from view. To see it again, use the keyboard shortcut we've already learned to temporarily switch to the Direct Selection Tool, which is by holding down the Ctrl (Win) / Command (Mac) key, and then click on the second anchor point to select it. As soon as you do, the missing direction handle reappears as if it was there the whole time (which it was):

Hold down the "Ctrl" (Win) / "Command" (Mac) key to temporarily switch to the Direct Selection Tool, then click on the top anchor point to select it. The missing anchor point reappears.
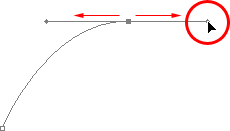
With your "Ctrl/Command" key still held down so you still have access to the Direct Selection Tool, try resizing each direction handle by clicking on the end of each one to select it and then dragging it towards and away from its anchor point. Again, hold "Shift" as you drag to constrain your movement horizontally, and watch what happens. As you increase the length of a handle, you get more of a curve, and as you decrease its length, you get less of a curve. Also notice that each handle controls its own side of the curve. The handle on the left controls the curve coming into the anchor point from the left, and the handle on the right controls the curve flowing out from the anchor point on the right.
Here, I've made my handle on the left shorter, and as we can see, there's much less of a curve now than there was originally, almost becoming a straight line. I've also made the handle on the right longer, and as a result, the curve on the right is now much more pronounced. The faint curve is the original for comparison:
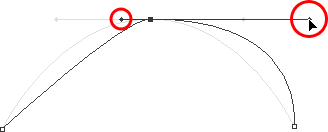
Change the shape of the curves by resizing the direction handles. The left handle controls the left curve, and the right handle controls the right curve.
I'm going to undo my changes by pressing Ctrl+Alt+Z (Win) / Command+Option+Z (Mac) a couple of times to set my direction handles back to their original sizes so they're equal length once again. Now let's try rotating the handles. Hold down "Ctrl/Command" once again to access the Direct Selection Tool, then click on the end of either handle to select it and try rotating it around the anchor point. Since we selected the handle with "Ctrl/Command", both handles rotate together. Here I've dragged my left handle down and to the right, and the angle of the curve on the left changed along with it, now appearing as more of a slope as it rises up towards the anchor point. By dragging the left handle down and to the right, I caused the right handle to rotate up and to the left, and again, the angle of the curve on the right changed along with it, now rising above the anchor point briefly before making a steep decent down to the anchor point on the right. Again, the faint curve is the original for comparison:
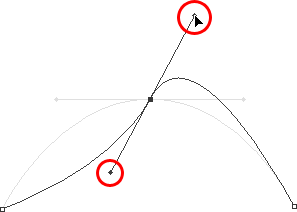
Rotate the direction handles to change the angle of the curves. Select a handle while holding "Ctrl" (Win) / "Command" (Mac) to rotate both handles together.
The Dreaded "Loop"
One thing you want to avoid is rotating the handles too far, which will cause your path segments to overlap and create loops. Here, I've rotated my handles all the way around so that the left handle is now on the right and the right handle is on the left, and notice what's happened. My path segments are now overlapping each other, creating a loop:
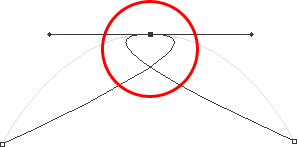
Rotating the direction handles too far causes the path segments to overlap, creating an unwanted loop in the path.
Loops can be caused by rotating the direction handles too far, as I've done above, but more often than not, they're caused by a handle being too long, making the curve too long and causing it to overlap with itself. If that happens, which it does sometimes as you're drawing a path, simply shorten the length of the direction handle. Most people end up creating a whole bunch of loops in their path when they first start working with the Pen Tool, so don't think you're the only one. No need to panic or become frustrated though. As I said, the problem is most likely being caused by a direction handle being too long, and all you need to do is shorten the handle to "un loop" the loop!
I'm going to press Ctrl+Alt+Z (Win) / Command+Option+Z (Mac) a few times once again to undo my changes and reset my path back to the nice smooth arc I started with. Now, what about rotating the direction handles independently of each other? As we learned on the previous page, to rotate the handles separately, instead of selecting them with "Ctrl/Command", we simply select them while holding down Alt (Win) / Option (Mac), which gives us temporary access to the Convert Point Tool. Click on the end of a handle to select it, then drag it with your mouse to rotate it and this time, the other handle will stay in place, breaking the connection between them.
Here, I've selected the handle on the right while holding "Alt/Option" and then rotated it down and to the left. Notice how once again, the angle of the path segment on the right changes to match the new direction of the handle, and this time, the handle on the left, along with the path segment on the left, both stay in place. My path now looks a bit like a shark fin:
Hold down "Alt" (Win) / "Option" (Mac) to temporarily access the "Convert Point Tool", then click on the end of a direction handle to select it and rotate it independently of the other handle.
Moving An Anchor Point
One thing we haven't looked at yet is how to move an anchor point. If you recall, I mentioned on the previous page that the Pen Tool is extremely forgiving, and one of the reasons for it, besides being able to rotate and resize our direction handles after we've created them, is that we can easily move anchor points from one spot to another if we need to. As we've already learned, anchor points anchor a path into place. The anchor points themselves, however, are not anchored into place. You can move an anchor point anywhere, anytime, and any path segments that are connected to it will move and adjust right along with it.
To move an anchor point, hold down Ctrl (Win) / Command (Mac) to temporarily access the Direct Selection Tool as we've already been doing, then simply click on the anchor point to select it and drag it to its new location with your mouse. Any path segments connected to it will move with it to the new location. Here, I've dragged my middle anchor point down a bit from its original location (again, the faint path marks the original location for comparison). Notice how the path itself has changed shape to adjust to the new location of the anchor point:
Hold down "Ctrl" (Win) / "Command" (Mac) and click on an anchor point to select it, then drag it to a new location. Any path segments connected to the point will move with it, changing shape as needed.
Normally, when outlining an object with a path to select it using the Pen Tool, you won't need to move to an anchor point quite as far as what I've done above, but it's very common to go back around your path after you've created it and nudge a few anchor points here and there to fine-tune the path. Once you've selected an anchor point, you can nudge it up, down, left or right using the arrow keys on your keyboard.
Combining Straight Paths With Curves
What if I didn't want both of my path segments to be curves? What if what I needed was for the first path segment to be curved, but the second one needed to be straight? La oss se hvordan vi gjør det. I'm going to delete my existing path and start over again. First, I'll click to add an anchor point to start things off. Then, just as before, I'll click to add a second anchor point up and to the right of my initial point, and this time, I'll drag out direction handles, which will create a curved path connecting the two points, giving me exactly what I had way up at the start of this page:
Click once to add an anchor point, then click to add a second anchor point and drag out direction handles to create a curve.
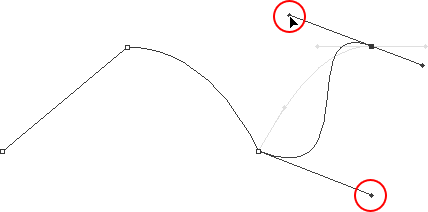
I now have my initial curve, but I want my next path segment to be straight. If I was to simply click somewhere to add another anchor point right now, I would get another curve because I have that direction handle extending out from the right side of the last anchor point I added. What I need to do is get rid of that one direction handle. Without a direction handle controlling the angle and length of a curve, we get a straight line.
To remove the handle, leaving only the handle on the left of the anchor point, all I need to do is hold down Alt (Win) / Option (Mac), which will again temporarily switch me to the Convert Point Tool, and then I just click directly on the anchor point. When I do, the direction handle on the right disappears, leaving only the one on the left:
Hold down "Alt" (Win) / "Option" (Mac) and click directly on the anchor point to remove the direction handle on the right, leaving only the one on the left.
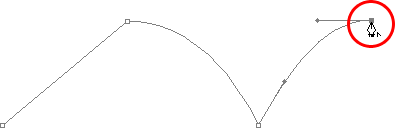
Now, with the direction handle gone, if I click to add a new anchor point, I get a straight path segment between the two points :
With the direction handle on the right now gone, clicking to add a new anchor point adds a straight path segment between the two points.
I now have a curved path segment on the left and a straight one on the right! What if I wanted the exact opposite? Suppose I needed to start with a straight path segment and then follow it with a curve? To do that, first I'll start by clicking to add an initial anchor point. Then, since I want a straight path segment, all I need to do is click somewhere else to add a second anchor point, and I automatically get a straight path connecting the two points:
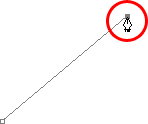
Click with the Pen Tool to add an initial anchor point, then click again somewhere else to add a second anchor point and create a straight path segment between them.
I'm going to keep my mouse button held down after clicking to add my second anchor point because I want my next path segment to be curved, and we know that in order to create a curve, we need a direction handle. To add a handle extending out from the right of my anchor point, I'm going to hold down Alt (Win) / Option (Mac), and with my mouse button still down, I'm simply going to to drag to the right of the anchor point. As I do, a direction handle will drag out along with it:
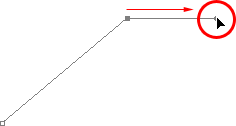
Hold down "Alt" (Win) / "Option" (Mac) and drag out a direction handle on the right of the anchor point.
Notice that the direction handle extended only from the right of the anchor point, not from both sides, leaving my straight path segment on the left in place. And now that I have my direction handle on the right, all I need to do to create my curve is click to add a third point:
Click to add a third anchor point, which creates a curved path segment between the previous anchor point and the new one.
And there we go! I now have a straight path segment on the left, followed by a curved segment on the right. Of course, most paths you draw are going to consist of more than just three anchor points. Let's say I wanted to continue this path, moving in the same general direction towards the right, and I want my next path segment to be curved as well. Just as I did a moment ago, I would leave my mouse button held down after clicking to add my third point. I would hold down Alt (Win) / Option (Mac) and I would drag out another direction handle. So far, we've only been dragging handles out towards the right, but what you really want to do is drag your handles out in the general direction you want the curve to follow. I want to create a curve that goes up and to the right, so I'm going to drag out a small handle in that same general direction:
Drag out your direction handles in the general direction of the curve.
Tips! A good practice to get into is to keep your direction handles small when first dragging them out, since you never really know how long or at what exact angle they need to be until the actual curve appears, and the curve doesn't appear until you've added both of its anchor points. Once you've added both points and the curve appears, you can easily go back and make any adjustments you need to the handles. You may even want to wait until you've drawn the entire path before worrying about adjusting the handles.
With my direction handle created, I'm going to click to add a fourth anchor point, and I'm going to drag out direction handles from it as well:
Adding a fourth anchor point along with direction handles extending from it.
I now have a third segment added to my path, this one being a curve. Notice that this curve actually has two direction handles controlling it, one extending from the right of my third anchor point and one extending from the left of my fourth point:

The third path segment now has two direction handles, one on either end, working together to control the curve.
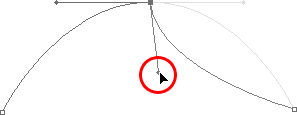
The overall shape of this curve is now being controlled by the length and direction of both of these handles. Watch what happens to the curve when I move the handles. I'll drag the bottom handle down and to the right, and I'll drag the top handle up and to the left. I'll also drag both of these handles longer. The faint curve is the original for comparison:
Changing the direction and/or length of either handle changes the overall shape of the curve. After rotating and lengthening both handles, the curve now appears in an "S" shape.
The curve is now a bit "S" shaped, and that's because the bottom handle is controlling the angle and length of the curve as it flows out from the third anchor point, while the top handle is controlling the angle and length of the curve as it flows into the fourth point. Changing the length and/or direction of either handle will change the overall shape of the curve.
I'm going to press Ctrl+Alt+Z (Win) / Command+Option+Z (Mac) a couple of times to undo the changes I made, so the curve is once again in a simple arc shape as it was a moment ago, and I think I'll finish off this path with another straight segment, which means I'll need to remove that direction handle extending out from the right side of the fourth anchor point. We've already learned how to do that, by holding down Alt (Win) / Option (Mac) and clicking directly on the anchor point itself:
Hold down "Alt" (Win) / "Option" (Mac) and click directly on the anchor point to remove the direction handle on the right.
With the direction handle gone, all I need to do now to add a straight path segment is click to add another anchor point:
The direction handle on the right is now gone, so we can add a straight path segment simply by clicking to add another anchor point.
We could continue this path for as long as we wanted, adding more straight segments and curves, but I think we'll stop here because we've pretty much covered everything we need to know about drawing paths with the Pen Tool at this point. That was a lot of information to take in, especially if this is your first time learning about paths. As I mentioned at the beginning, you won't become a Pen Master simply by reading through this tutorial, just as you won't learn how to ride a bike, or drive a car, learn to swim, or play the piano simply by reading about it. But hopefully you have some sense at this point of how to draw paths with the Pen Tool, how to draw straight path segments, how to draw curves by dragging out direction handles, how to change the length and angle of the curve by rotating and resizing the handles, and how to combine straight and curved segments in a path.
To finish off our look at making selections with the Pen Tool, let's see a practical example of how to select an object with curves.
Here, we have a photo of a couple of dolphins leaping out of the water. Definitely a couple of very curvy creatures:

A photo of two dolphins jumping out of the water.
Let's say we want to select these dolphins so we can use them for a design or a collage, or whatever the case may be. If you were to try selecting them with the Lasso Tool, which is most likely what you would end up using if you didn't know how to use the Pen Tool, not only would you have a tough time, you'd have an even tougher time trying to convince yourself that you were happy with the results when you were done. The reason is because the Lasso Tool simply isn't capable of making curved selections very well. The biggest problem with it, besides being a pixel-based selection tool, is that it relies on you having a steady enough hand to move it smoothly around the curves. Even if you don't suffer from a caffeine addiction, you could drive yourself crazy trying to draw a perfectly smooth curve with your mouse, or even with a pen tablet, and when you've finally given up, you'll still be left with a selection full of rough, jagged edges that just scream "amateur!". No one likes to be called an amateur, especially when there's no need for it thanks to the Pen Tool!
Examine The Object First
Whenever you're about to select something with the Pen Tool, before you begin, take a moment to examine the object carefully to get a sense of where you're going to need to place your anchor points. Forget about all the details in the object and focus only on its shape. Where are the areas where the shape changes direction? Which parts of the shape are straight? Which parts are curved? If there's a curve, is it a smooth, continuous arc or does the angle change at a spot along the curve? Visualize in your mind where you're going to need to place your anchor points, because when you place one, you always want to be thinking about the next one and what the path segment between the two points needs to look like.
A Tool Of Elegance
One more thing to keep in mind is that the Pen Tool is meant to be a tool of elegance . It's not a nail gun or a staple gun. You don't want to just go clicking around your shape adding anchor points all "willy nilly" (that's a technical term). When using it to draw curves, you want those curves to be nice and smooth, otherwise we might as well just stick with the Lasso Tool. To keep the curves flowing smoothly, we need to limit the number of anchor points we use to create them. That's why you want to take a moment to examine the object first and visualize where the anchor points need to be. If you can outline a large section of the shape using only one curve with an anchor point on either end, that's what you want to do, because that's what's going to give you the kind of results you're looking for. The kind of results that scream "definitely not an amateur!".
Let's select these dolphins. I'm going to start my path in the middle of the photo, at the spot where the side of the dolphin on the left overlaps the rear flipper of the dolphin on the right. There's no right or wrong place to begin a path. This is just where I've decided to start. The first part of that rear flipper is straight, so since I don't need a direction handle to create a straight path segment, I'm simply going to click once with my Pen Tool to add my first anchor point, which will serve as the starting point for my path:
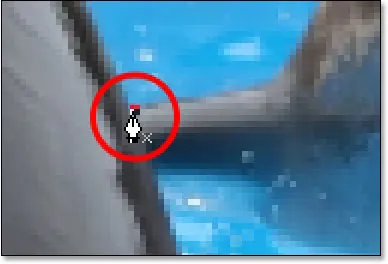
Adding the first anchor point.
As I mentioned earlier, you'll probably find it helpful to zoom in on your image as you're drawing your path. To scroll the image around on the screen as you're zoomed in, hold down the spacebar, which will switch you temporarily to the Hand Tool and allow you to move the image around on the screen by clicking and dragging it.
The top of that flipper actually has a slight curve to it as it approaches the dolphin's tail section, so for my second anchor point, I'm going to click at the point where the flipper and tail section meet, and I'm going to drag out short direction handles, dragging up and to the right in the direction that the tail section is moving. Notice that I've now created a slight curve along the flipper:
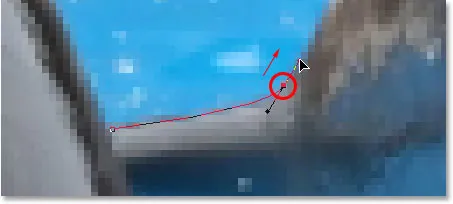
Adding the second anchor point and dragging out small direction handles to add a slight curve to the first path segment.
As I continue up along the tail, I can see that it stays straight for a short distance, followed by a curve to the right, so I'm going to click to add a third anchor point at the spot where the curve begins. This gives me a straight path segment between the previous point and the new one. I know there's a short direction handle extending out from the previous anchor point, which normally means that my new path segment will be a curve, not a straight section, but because the handle is so short and is also moving in the same direction as the path segment, there is no noticeable curve to it. Consider it a "mostly straight" path segment:
Clicking to add the third anchor point, creating a (mostly) straight path segment.
Continuing along, we come to the first real curve in our path. For this, I'm going to need to drag out a direction handle from the anchor point I just added, so I'm going to hold down Alt (Win) / Option (Mac), then drag out a handle in the general direction where I want the curve to flow as it starts. Notice how I'm only dragging out a handle from the one side of the anchor point, not both:
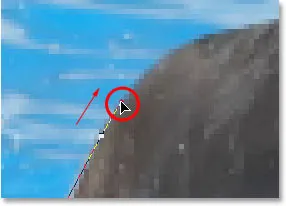
Hold "Alt" (Win) / "Option" (Mac) to drag out a direction handle from one side of an anchor point.
To add the curve, I'll click and drag at the spot where the curve ends, shaping the curve as I drag out the handles until it matches the curve of the dolphin's tail. If I needed to, I could also go back and change the length and direction of the handle at the start of the curve to fine-tune it, but in this case, I don't need to do that:
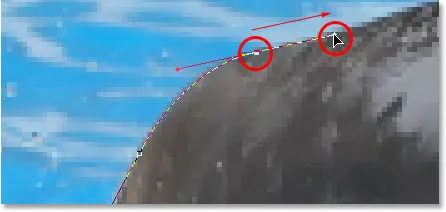
Adding an anchor point at the opposite end of the curve and dragging out direction handles from it, rotating and resizing them as needed until the curve matches the curve of the object.
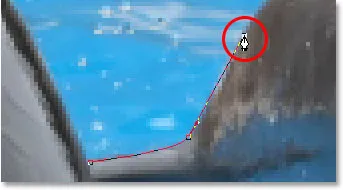
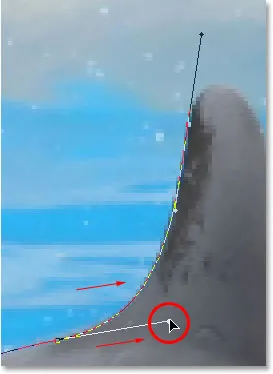
The next area of the dolphin is pretty straight, right up until its back begins to merge with its dorsal fin, at which point there's another curve, so I'm going to click to add an anchor point just before the curve up the dorsal fin begins, which is going to give me another "mostly straight" path segment between the previous point and the new point. Then I'm going to once again hold down Alt (Win) / Option (Mac) and drag out a direction handle as I prepare for my next path segment which will be curved:
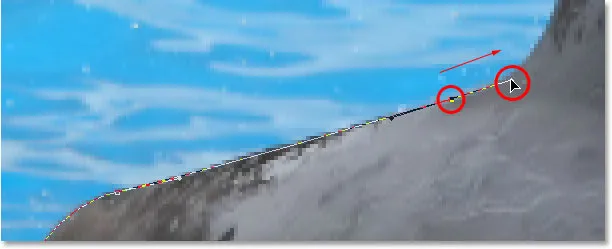
Click to add an anchor point, then hold down "Alt" (Win) / "Option" (Mac) and drag out a direction handle to prepare for the next path segment.
The left side of the dorsal fin consists mainly of one continuous curve upward until it gets near the very top, at which point the shape changes, so to create this curve, I'm going to click and drag at the point near the top where the curve will change direction. As we can see in the screenshot, this adds a curved path segment between the previous anchor point and the new one, but the curve is not yet following along the shape of the fin. It's going to need some fine-tuning:
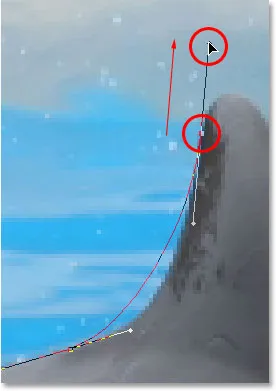
Adding a curve along the left side of the dorsal fin. The curve still needs some adjusting.
To adjust the curve, I'm simply going to hold down the Ctrl (Win) / Command (Mac) key, which gives me temporary access to the Direct Selection Tool, and I'm going to drag the handle extending out from the bottom anchor point towards the right to lengthen it, which is going to pull the angle of the curve in towards the right along with it, lining it up nicely with the curve of the fin. I've also rotated the top direction handles slightly in a clockwise direction just to be nit-picky, but the majority of the adjustment was done using the bottom direction handle:
Adjust the curve by adjusting its direction handles.
To add a curve around the top of the fin, I'll click and drag on the opposite side of it to add another anchor point with short direction handles. Notice though that we run into a bit of a problem. The direction handle on the left side of the curve is too long and it's pulling the curve away from the top of the fin:
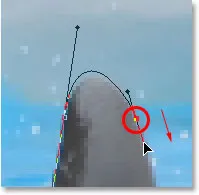
The direction handle on the left of the curve is too long, resulting in the curve not following the shape of the fin.
To fix that, all I need to do is once again hold down Ctrl (Win) / Command (Mac), then click on the end of the handle to select it and drag it shorter until the curve is the proper shape:
Shortening the length of the direction handle to adjust the shape of the curve.
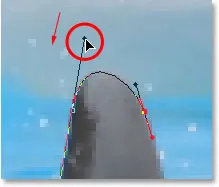
Let's finish creating our path around the dorsal fin. The remainder of the fin is basically a straight line, so I'm going to click at the base of the fin to add another anchor point which adds the straight path segment, completing our path around the fin:
Adding an anchor point at the base of the fin to finish drawing the path around it.
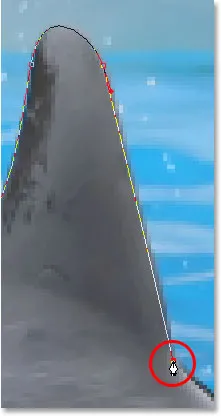
Since you and I would both be here all day if I was to continue commenting on every anchor point, direction handle and path segment as we make our way slowly around the dolphins, and since we've covered everything we need to know at this point, I'm going to go ahead and draw the rest of the path, outlining both dolphins:

Both dolphins are now outlined by the path.
The dolphins have now been outlined with the path, and if we look at the Paths palette, we can see that sure enough, we have a path in the shape of the dolphins:
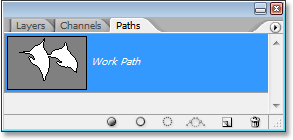
Photoshop's Paths palette showing the outline of the dolphins in the preview thumbnail.
As we've learned, Photoshop automatically names the path "Work Path", which means it's temporary and will be replaced if we start a new path. If you wanted to save it, you would need to double-click on the name "Work Path" and rename it to something else, like "Dolphins" in this case. I'm not going to worry about that, since I have no need to save it. All I want to do at this point is convert my path into a selection, and since I'm already in the Paths palette, I'll do that by clicking on the Load path as selection icon at the bottom of the palette:
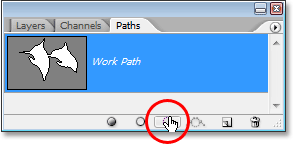
Clicking the "Load path as selection" icon at the bottom of the Paths palette.
I could also have used the keyboard shortcut Ctrl+Enter (Win) / Command+Return (Mac) . Either way converts my path into a selection, and if I look at my photo, I can see that my path has indeed become a selection around the dolphins:

The path around the dolphins has now been converted into a selection.
Hvor skal du neste …
Og der har vi det! The dolphins are now selected and ready for whatever plans we have for them. And with that, we wrap up our look at drawing paths and making selections with the Pen Tool in Photoshop! For mer om Photoshop sine valgverktøy, se vår Hvordan gjøre valg i Photoshop-serien. Besøk vår Photoshop Basics-seksjon for flere Photoshop-emner!